Freebies for babies

Before we even begin here, let me state that I’m NOT pregnant. In case this post suggests that I am.

Recently, a friend of mine suggested that I write a post about all the free items you can get while you are pregnant or when you have a baby. My daughter turned two in the summer, so I had to think back a ways!
And it’s funny. I just counted how many women I know that are pregnant. There are at least 7!

Anyway, on to the good stuff.

Nestlé baby:
This was the best freebie package I received when I was pregnant. Mine included a pack of diapers, powder formula, premixed formula, a diaper bag, information booklet, a bottle, and coupons. Depending on when you sign up for this, you get different things. I also received emails frequently, with information about my developing baby.

To sign up with nestle baby, click here
The website has a lot of useful information as well. Whether you formula feed or not. Whether you are pregnant or have had your baby already.

IMG_0593.PNG

Similac:
While my daughter was an infant, I ended up needing to use formula. This is the brand that worked best for my daughter. They send coupons for money off of formula. They also send samples of powder formula and information on your ever changing baby.
Click here to sign up with Similac.

IMG_0592.PNG

Enfamil:
This company will send you a sample of powder formula as well as information on your baby. I’ve heard many people recommend this brand if you are needing to formula feed, although if did not use it.
To sign up, click here.

IMG_0594.PNG

Babies R us:
I registered with them ( in store ) and received a bag full of goodies. It’s worth it to do a registry with them, even if people don’t buy you items from there.

Now, some people when they are pregnant think that they won’t need formula, so they don’t sign up with the companies. I think it is still a good idea to sign up for a couple of reasons:
1) there are a lot of other perks like free gear and useful information

2) a lot of people who use formula never planned on needing it. Like me. It was nice having the samples to see what worked best. If you don’t end up needing it, great! But then donate it to someone who does. Formula is expensive!

One other freebie to sign up for is the safety latch from P&G. You’ll be glad you got this when all of a sudden your baby becomes mobile!

Do you know of any other freebies available for pregnant women, new moms and babies?

Birthday party

Hi again, It’s me Adrienne, here for another guest blog post!
Today I want to talk about planning a Birthday party…for yourself!
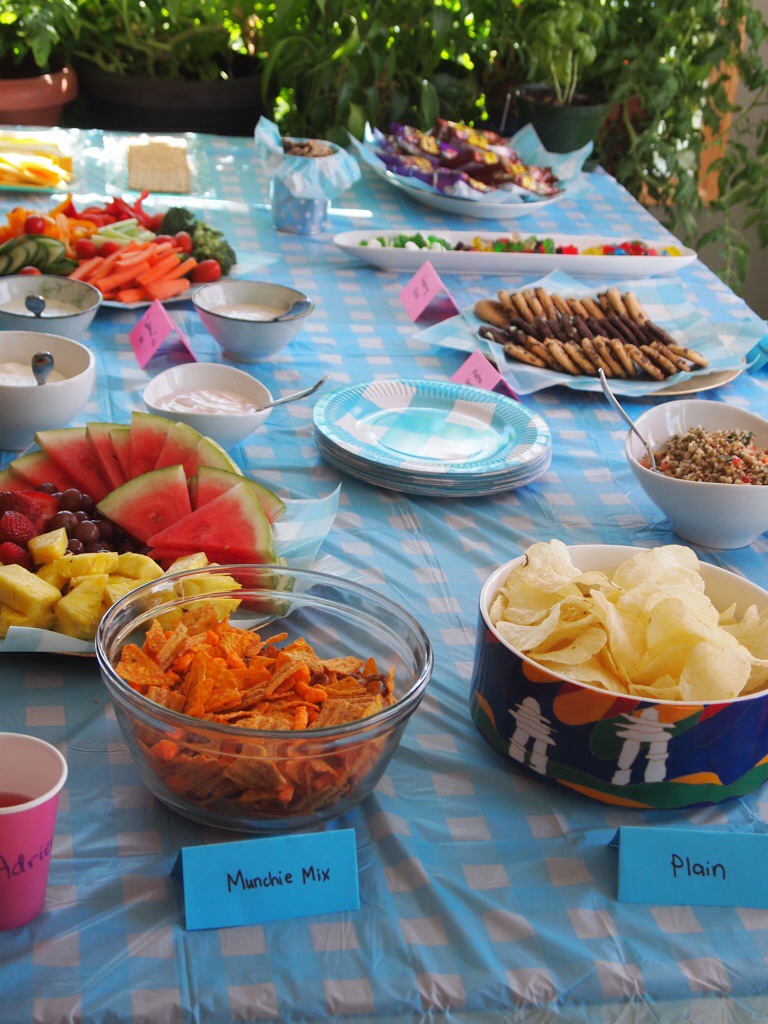
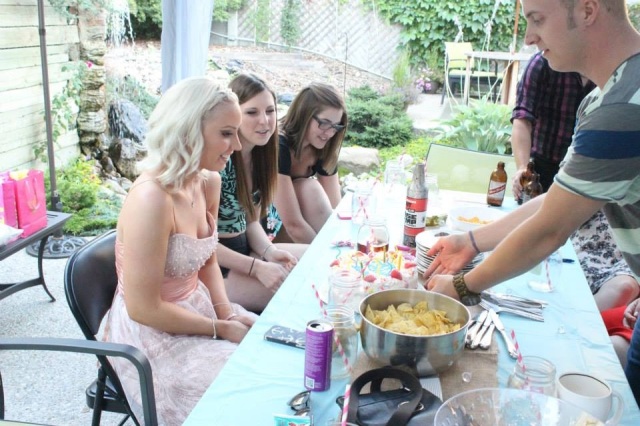
I used pinterest quite a bit to get ideas, I even made a Birthday board to keep things organized. So first thing when planning a party, when do you want it? Morning, afternoon, night? Then pick a date & a theme. Next step invitations. I just made a Facebook event which I know isn’t all that creative but it was the best & most efficient way to get all my friends together in one place. I picked a sunday afternoon to evening, 4pm-10pm. It was a Birthday BBQ where I requested all guests attending to bring a dish of their choice, so a potluck. I supplied burgers, hot dogs, chips, ice cream cake, spinach dip (made by my lovely boyfriend Dustin) & beverages. Make sure that you find out in advance what your guests are bringing so you can prepare accordingly. You don’t want 6 people all bringing cheese bread. Or no one bringing a veggie tray. Or whatever it is that you have on your menu.

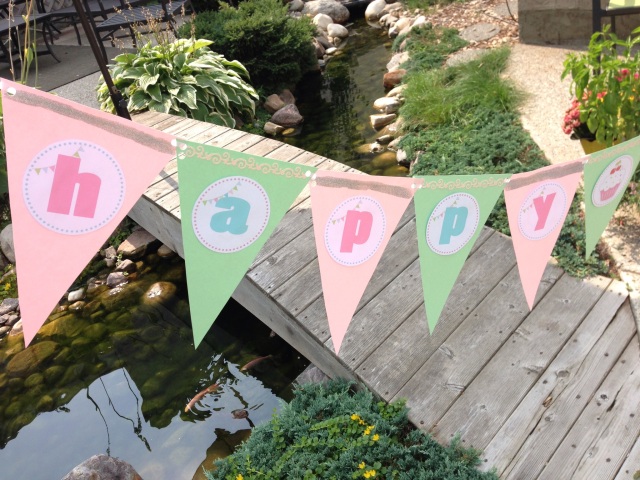
I hosted the party in my parents backyard. My best friend, Jenna let me borrow her small tent to provide cover over a banquet table that I set out. I decorated my table with a plastic tiffany blue table cloth from Party City, then cut a strip of burlap to make a table runner (burlap also supplied by Jenna) & a sparkly ribbon down the centre of that. I then sprinkled these pretty fake gems on the burlap to make it look a little glam. My boyfriend’s friend was kind enough to bring me flowers as a gift so I popped those on the centre of the table & it looked great. I did make a birthday banner for myself. I found the “Happy Birthday” off a free printables site but then cut out triangles for each letter. I glued each letter onto the triangles with a hot glue gun so it would stick really well & dry quickly. Then because I like a little sparkle on things I used mod podge on the top of 1/2 of them (I did every second triangle) & dusted loose glitter on top. I always recommend covering your working space in newspaper so you can tidy up easily & don’t get glitter on absolutely everything. On the other half of the triangles I used pretty trim stickers. I’ll make sure to include a photo so you can understand better. I then used a single hole punch on the tops of the triangles & strung a white thin ribbon through, I used scrapbooking paper for my triangles so they were nice & stiff & not flimsy (just a tip). My Dad & I hung the banner from the front of the tent. It was perfect I was so proud of it! It didn’t take too long to make either. So if you can’t find one you like at the store you can always make one like I did. IMG_0549.JPG

IMG_0545.JPG

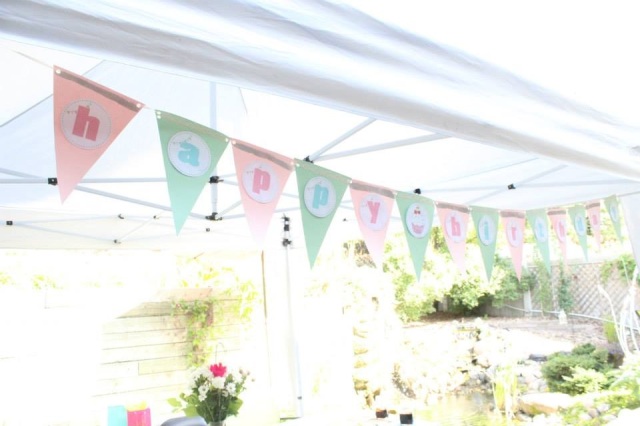
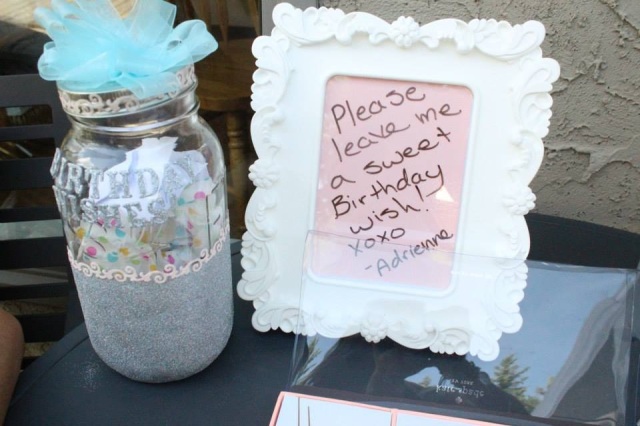
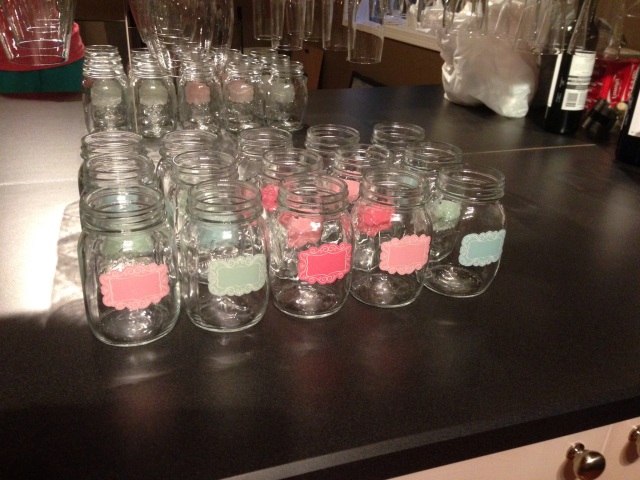
Something I thought would be fun was to make a wish jar. A wish jar is a jar decorated or not that you ask people to leave wishes in for you. I opted to decorate mine so pulling out the mod podge & glitter, I went to work. I used a small sponge brush to apply the glue & just sprinkled the glitter onto the jar. There was lots of excess glitter that fell onto my newspaper work space so I folded the paper in half & sort of funnelled as much as I could back into the glitter container. I used expensive glitter from Michael’s but you can always get cheaper stuff from the dollar store. It’s all about how much you want to spend & how much effort you want to put in. You can still have a gorgeous party using less expensive things, however in this case I wanted the expensive stuff. I used a hot glue gun to attach the “Birthday Wishes” lettering, which were also from Michael’s, as well as the jar itself because I wanted a big jar. I did look at the dollar store first, they didn’t have any in the size I wanted BUT they did have small mason jars 3 for $2. I bought 15 jars total to be used as drinking glasses. I was estimating 18-20 people to attend my party. From Michael’s, I also bought pink & white striped paper straws & chalkboard stickers to put on the jars! They were a huge success & to be honest I copied this idea from my friend Keltyn (she’s super clever & artistic). In the wish jar I put a pretty piece of tissue paper & glued a bow on the top. It was beautiful!
Now, why is a wish jar important to me? It’s important because when you’re having a glum day or not feeling like yourself you can pop open your wish jar & read all the kind, sweet (or funny) things that your friends have left for you. They are like tiny presents. I am so happy I made one for my party.

IMG_0547.JPG

IMG_0546.JPG

A tasty recipe for punch I found on pinterest I have to share with you because it’s so easy & delicious: 1 can of frozen lemonade, a big bottle of sprite, orange juice & cranberry cocktail. That’s it! So easy! I used the entire can of lemonade, the entire bottle of sprite, 1/2 the carton of orange juice & 1/2 the container of cranberry cocktail. Just taste test along the way. I also meant to put slices of orange & lemon for colour but I forgot but that would be pretty too. Oh & don’t forget to throw in the ice, keep it cold. I told all my guests that they could bring alcohol but to please be responsible, no drinking & driving. Everyone was respectful & responsible. Thank you friends!

I kept all the food (minus the burgers & hot dogs) & drinks inside the house to keep the bugs away & keep things organized. I made sure to hang a garbage bag outside for easy cleanup. A party always needs music so we popped some on. Also balloons! I bought a tank of helium at party city as well as white & Tiffany blue balloons. I had two of my boyfriend’s friends fill them up & gently let them float to the ceiling in the kitchen they looked really festive. This was Dustin’s idea.

Since I was going to be having all different people at my party from lots of different places, it was important to me to play an ice breaker game. I should mention I usually can’t stand playing most games, but this one was played right off the bat & it was speedy. I used a site called picmonkey.com to design a bingo game. I basically found a blank bingo sheet online & used that. Each box you had to write someone’s name. Whoever finished it the quickest won a prize, the prize was a $10 Starbucks gift card. This was fun it got everyone buzzing & excited. I’m so glad I went ahead with making it. Everyone was a good sport about it to. It can be hard sometimes to mingle with people you don’t know.

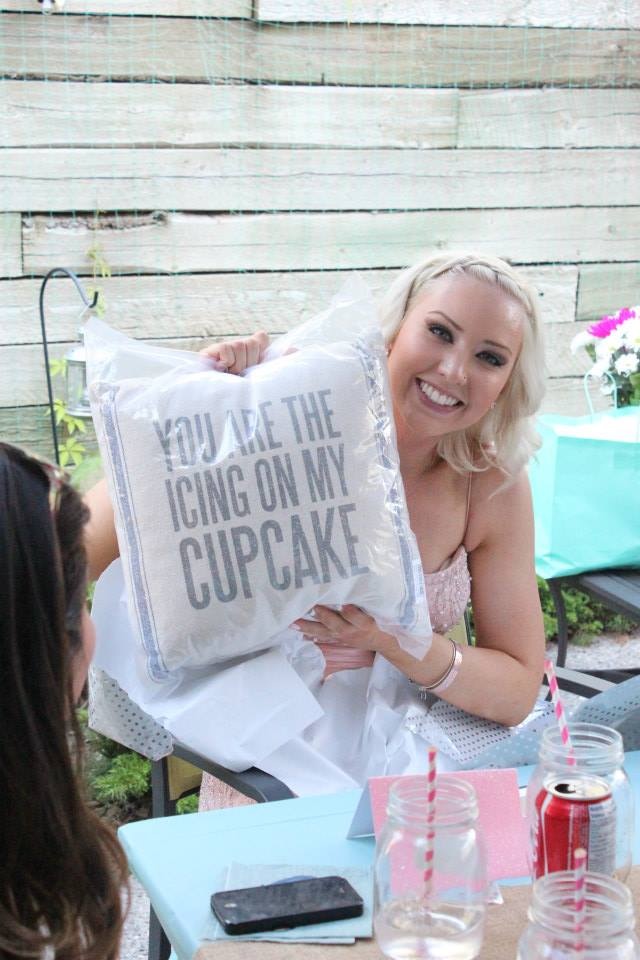
After the ice breaker game, Dustin & I decided it was time for people to eat. He fired up the grill for me & took care of the bbqing. Everyone had lots to eat I always make sure there is too much food because you never want to run out. For beverages other then my punch, I had icy lemon water outside, ginger ale & coke in a cooler inside & sparkling apple juice, a choice for everyone! Once everyone was stuffed I got to open presents! I can’t believe how spoiled I am! I didn’t request gifts but I got so many & wonderful, beautiful things! Thank you to all my friends, boyfriend & family for all the amazing things you all are so kind

IMG_0551.JPG

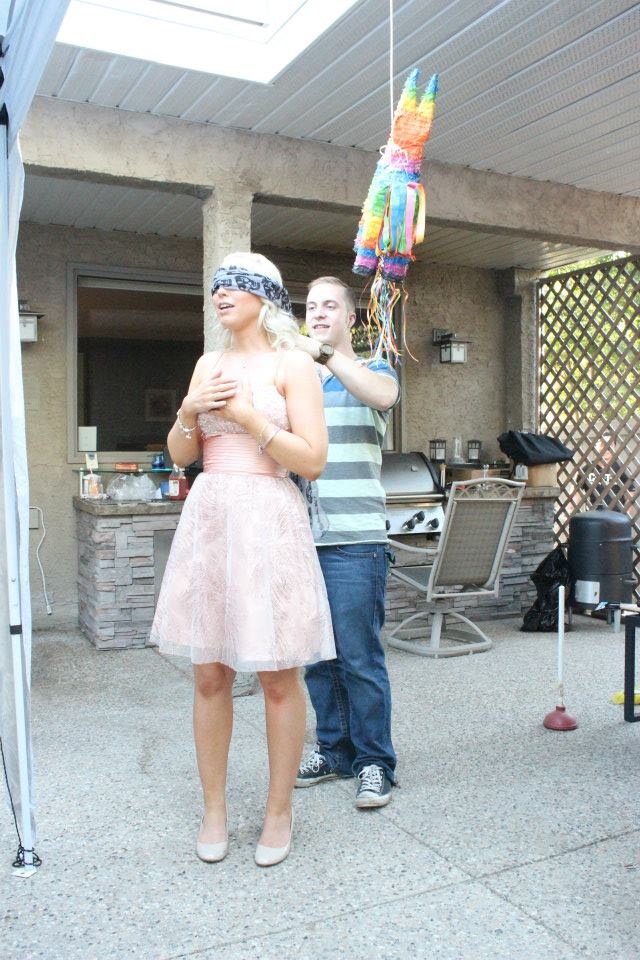
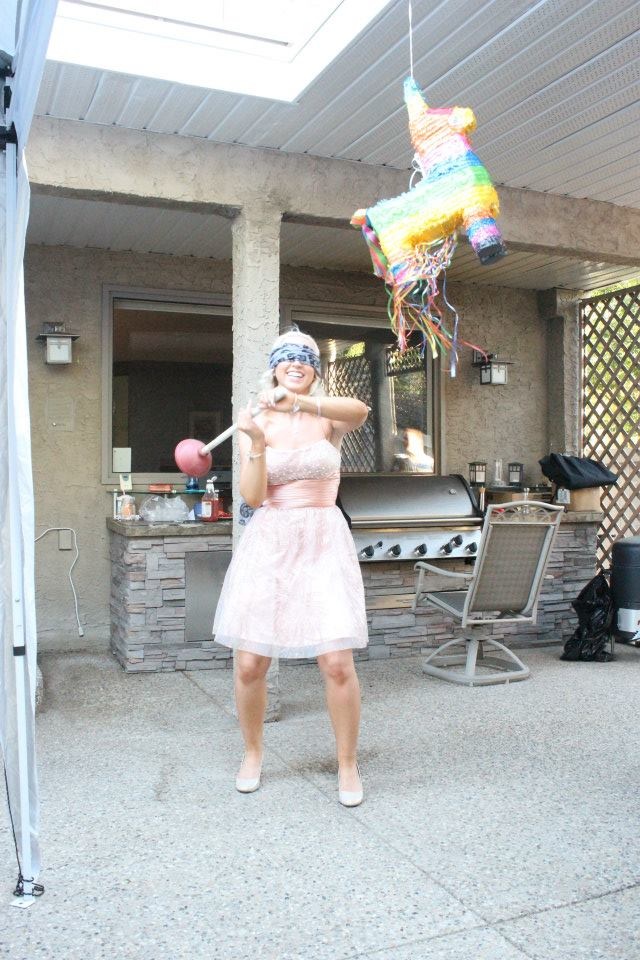
Now for my favourite part of my party! The piñata! I bought one of those colorful donkey piñatas & filled it full to the brim with sweets from the bulk barn, plus three $5 gift cards to Starbucks because I thought that might be a fun little surprise. However there was a twist, because grown adults could easily smash down a piñata with a stick, I had Dustin & his friend go around my house & find things to hit it with. I got stuck with a plunger! So just imagine me violently swinging a plunger in a party dress while blind folded, too hilarious! I must put a disclaimer though..there was a retractable snow brush in the mix & my poor friend Sarah thought she was good to go but 1/2 of it went flying off into the guests!! Oh dear! Luckily no one was hurt & nothing broke. So we all had a huge laugh about that. Jenna had a whisk, Leah had a cookie sheet. Dustin wrote all the items on paper & we put them in a bowl to pick. I went first & after that we just picked who would be next, it was a laugh riot!

IMG_0550.JPG

IMG_0552.JPG

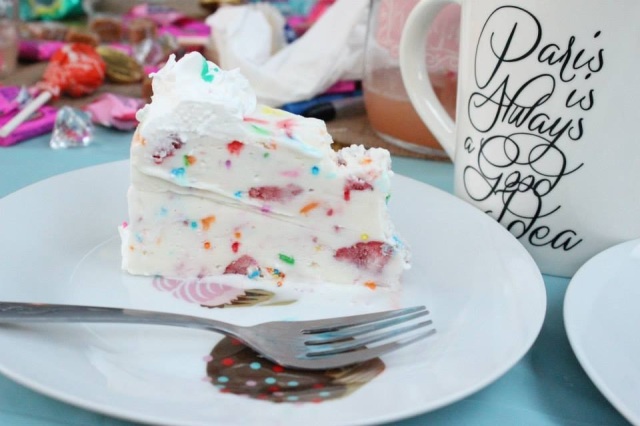
Once the piñata was smashed & the candy exploded everywhere it was time for cake! Dustin brought out the cake & everyone sang Happy Birthday. I felt so special & lucky at that moment! Everyone had come to my house to celebrate my birthday with me & that truly was the most special gift of all.

IMG_0554.JPG

IMG_0553.JPG

Now, I had bought a bunch of things to make s’mores with on our outdoor fireplace but everyone was too full. So since I have so many s’more supplies I might try & create a s’mores Rice Krispie treat because why not! Dustin brought a game called cards against humanity. It’s rude & crude but hilarious. I don’t recommend it if you’re easily offended; it’s politically incorrect. Maybe go for the family friendly version apples to apples which is also fun.

Guests trickled out between 9 & 10 & everyone was gone by 11:15 pm. It was a huge success! All my planning & pinteresting had paid off! I wrote up thank you cards to all my guests & sent them off in the mail. My party wouldn’t have been complete without all my friends.

So quick recap here for party planning 101 with Adrienne
1. Pick a date & time
2. Location
3. Invitations
4. Food
5. Decoration & set up
6.Party games or activities
7.Music
It’s not hard to throw a party you just have to be organized. Thank you again to everyone who did attend my Birthday, it meant the world to me that you were there. I hope this helps you for organizing your next party. Make sure to look on Pinterest for great party ideas & more!

-Adrienne

Get rid of smelly towels

Every six months or so, I start noticing that our clean towels start to smell bad. Last year, I went to pinterest to solve this problem.
august 2014 678
I put all my towels into my front loading washing machine. For the first load, I mixed one cup of water and one cup of vinegar and poured it over the towels. Then I started the machine on a regular cycle with no detergent.
august 2014 679

Once the load is done, I mixed a cup of water with half a cup of baking soda and poured it over the towels in the washing machine. The same thing as before, start the washer on a regular cycle with no detergent.
august 2014 680

After a quick spin in the dryer, your towels should come out smelling nice. No more mildew smell!

IMG_8310.JPG
For the original post , and to see other helpful cleaning tips, click here.

Water play: dishes

Lately I’ve been picking activities that Chloe can do outside. Might as well take advantage of the beautiful weather! For this activity, I filled up a tub with warm water and soap and put it on our deck.

IMG_8293.JPG
Chloe and I used her shopping cart and found all the plastic dishes for her play kitchen and brought it outside. We put some into the tub and some stayed in the cart until there was room.
I also filled up another tub with cool water for rinsing. And I laid a towel down for the dishes to dry in the sun.

IMG_8295-0.JPG
I chose a scrub brush, sponge and wash cloth for us to use. Chloe opted to use the scrub brush only.
I would hold the dish and Chloe would scrub each one. We would put the dish into the rinsing water and then on to the towel to dry.
august 2014 683
At first, I wasn’t sure how much Chloe was enjoying herself. She washed the dishes but didn’t seem too into it. But after we finished, I walked away to do other work outside, and Chloe continued to play in the water. She was using the dishes, pouring water and scrubbing dishes. After that, she moved on to scrubbing parts of the deck and patio furniture. Total, I figure she played with this set up for about 45 minutes. And the only reason she stopped was because I told her it was time to clean up. So I guess you could say she enjoyed herself!

Gotta love garage sales

One of my favorite things about summer is garage sales. The town I live in has lots of young families, so the garage sales are usually pretty good (for me, anyway).
There are a couple reasons I really like garage sales.
1) I can buy things in perfectly good condition for my daughter at a fraction of the cost of new. No guilt on how much I spent.
2) because things are so cheap, if she doesn’t like them right away, I can store them in a closet until she’s older, even if only by a month. Or, I can store some items for trips etc. I did that for our last trip, and will do it for the next as well.
3) most garage sales have books. I’m a book lover. My daughter has several books. Ok, shelves full. And I’m always happy when more is added. So $0.25 and $0.50 books can’t be argued with! To the collection they go!

Some of you, especially those who know me, might be thinking that it was Chloe’s birthday only last week, and she got ridiculously spoiled. Well, you’re right. But I can’t help myself with garage sales. And like I previously stated, some will end up being put away for future use.
And on that point, some of her birthday gifts are put away for future use as well.

Here is my latest garage sale haul:

20140713-183710-67030477.jpg
A Dora tent for $2. It’s small but it’s also awesome.
A Dora pillow that turns into a blanket $5
A Cinderella Barbie $0.50
A sleeping beauty Barbie $0.50
And a lot of books $8.50
For a total of $16.50

Now this haul isn’t typical. I usually get just a couple items totally a few dollars. And I definitely don’t garage sale every weekend. We would need a bigger house if I did…

20140713-184130-67290810.jpg

Do you like garage sales? What kinds of things do you typically look for or buy?

I’m all about the kid stuff. I usually look for clothes and books. In the past, we’ve gotten patio furniture (whole set for $60), Chloe’s snow suit ($15), water table ($5), clothes for Chloe, pjs for Chloe, and of course toys and books. I love it!

Teddy Bear/Stuffed Animal Picnic Birthday Party

Birthday parties. Tons of fun, lots of work. On the weekend, we had a party celebrating our daughters second birthday. For a few months, I flip flopped between themes. Chloe is into a few tv shows, but they are the less popular ones that don’t have merchandise at every store. Or any store for that matter. So I came up with the theme Teddy Bear Picnic, but bringing a bunch of stuffed animals that weren’t just teddy bears.

The colour scheme was blue and pink since I found blue gingham plates, napkins, basket liners and table cloths at Target (in the dollar bin at that!). I also found pink gingham plates at the dollar store for the cupcakes.

We decorated two windows with streamers, put up a happy birthday banner, and put all the snacks on a decorated table inside.

20140708-144508-53108055.jpg

20140708-144531-53131491.jpg

We had lots of snacks, but the themed ones were:
Teddy Graham’s
Bear paws
Pink lemonade punch
Gummi bears

20140708-144713-53233749.jpg

The activities for the kids were minimal. There was a kiddie pool, stuffed animals, a blow up tent, sidewalk chalk, water table, and backyard toys. There was also colouring and toys inside because it was hot and windy out.

20140708-145944-53984998.jpg

20140708-150732-54452971.jpg

For cupcakes, there were two kinds. Rainbow bit (from a box) with homemade buttercream frosting, dyed blue and pink, topped with a teddy graham. Then I also made homemade chocolate cupcakes with a honey buttercream frosting.
OLYMPUS DIGITAL CAMERA

OLYMPUS DIGITAL CAMERA

For this party, I didn’t go all out. But I also wanted to put some effort in to pull off the theme. I am very happy with how it turned out.
Here is the birthday girl, about to get her cupcake
OLYMPUS DIGITAL CAMERA
Cupcake decoration and photo credits to Adrienne. Decorations and other work credit to Shannon.

Fire starter

A simple homemade fire starter idea from over the big moon caught my eye a while back. It uses 3 simple things you would have around the house: dryer lint, toilet paper rolls and news paper.

20140602-103027-37827131.jpg
I figured I would make some as we will be camping this summer. On our last night of our trip, we decided to camp. My chance to use the fire starter I made!

20140602-103139-37899236.jpg

20140602-103140-37900664.jpg

20140602-103142-37902305.jpg
Matt is usually in charge of the fire. So he kindly put my roll into his set up and let me light it.

20140602-103257-37977509.jpg
I figured my roll would catch fire right away. Turns out that wasn’t the case. I lit it with a match. The paper caught fire but went out before catching the cardboard or lint on fire. I tried a few matches before it took and then we also lit some other parts of the wood to get the fire going.

20140602-103618-38178120.jpg
Eventually, we got a nice fire going. Matt said the next time I make the fire starter, to try using black and white news print as it burns better than colour ink. I don’t think I’ll bother making any next time.

Vancouver aquarium

So, I’ve been on holidays and haven’t written anything for a few days. We’ve been doing a lot and visiting a lot of people.
One of the places we visited was the Vancouver Aquarium. We were really excited to take Chloe there. She loves animals and fish etc.
Also, when Chloe was a baby, the only thing that would or could calm her down was the song Baby Beluga by Raffi.
So, we were pretty excited to take her to see the beluga whales as well. (That song doesn’t work anymore, by the way. But it has over 1400 plays on my phone alone).
We decided to go to the aquarium on Sunday. Maybe that was a mistake. We went around 3pm and it closes at 5 so we didn’t think it would be too bad. But it was so busy! It didn’t help that it was rainy that day, either.

The first part of the aquarium we checked out, was the jelly fish.

20140528-160532-57932921.jpg

20140528-160629-57989773.jpg

20140528-160631-57991903.jpg
Chloe thought the jellyfish were awesome. She kept telling us every time we passed some. “Mommy, daddy, jellyfish!”

20140528-160853-58133763.jpg
Chloe also loved pointing at the fish, but she was a bit skeptical of the larger fish when she was up close.
She really was just happy looking at everything there. She was amazed by it all.

20140528-161417-58457777.jpg

20140528-161421-58461784.jpg

20140528-161419-58459785.jpg
For us, the belugas were the big highlight. We watched them from below.

20140528-162003-58803044.jpg

20140528-162159-58919926.jpgl
Then, we spent 15 minutes outside in the pouring rain, watching them from above.

20140528-162413-59053432.jpg

20140528-162417-59057635.jpg
And of course, being the tourists we are, we bought Chloe a bunch of beluga souvenirs.

20140528-162733-59253040.jpg
We got her beluga:
Socks
Tshirt
Bag
Stuffed animal
And a cup.
We also purchased a penguin umbrella since she also loves penguins.
It was not a cheap day…but it was well worth it!

Traveling with toddlers: entertainment

For our long roadtrip, I decided to put together several items for entertainment for Chloe. She is almost 2 so I find that a lot of things are either too young or too old for her.
Here are some of the things I assembled:

20140524-223959-81599266.jpg

20140524-224001-81601876.jpg

20140524-223957-81597830.jpg

20140524-223954-81594493.jpg

20140524-223955-81595919.jpg
We are fortunate enough to have a DVD player in our truck, so we brought along a bunch of movies, knowing this would end up being a huge part of Chloe’s entertainment.
I purchased some books from garage sales, and a couple from the bookstore in hopes that the novelty would last a little while. I also threw in some old favorites. Bedtime books were kept in Chloe’s suitcase, apart from the car books. During part of our trip, I sat in the back and read books with Chloe. Matt also took a turn in the back, reading books to her.

On Pinterest, I saw an idea for bringing a baking tray and magnets. I figured this was a worthwhile idea to try. In all honesty, Chloe was a bit too young for this one. We played together for probably 5-10 minutes out of our 12 hr drive so far. At first, I handed her one magnet at a time. Then she would place it on the tray. Sometimes I’d ask the colour and get a response.

20140524-224709-82029194.jpg
Then I tried sorting into colour groups. Chloe kept this up for a few magnets. Then took all the magnets off and handed them back to me, announcing that she was all done.

20140524-224837-82117471.jpg
Other activities I tried were a colouring book and a pompom container. Normally, Chloe loves colouring. Or ripping the paper off the crayons. Whichever. Anyway, I brought the crayons that have already been stripped of their paper. Chloe didn’t seem to interested. It lasted 5 minutes, tops.
The pompom container was a recycled cream cheese container with two holes in the top that Chloe could push pompoms through. At home, she can’t wait to play with pompoms. This lasted maybe 2 minutes in the car….

One activity that went well was playing with stickers. Once again, I was in the back with Chloe. I’d let her point to a sticker, I’d peel it off and then she’d stick it on the paper. She loved this.

20140524-225236-82356991.jpg

We have only done one part of our trip, so I have more time to try things again or try new things.

The two most entertaining things on the highway were 1) movies 2) snacks.
In the cities, Chloe happily looked out the window and pointed out every single bus and truck. So that kept her busy.

Do you have any suggestions for things for a toddler to do on long drives?

Sandwich rollups

This is a super quick post about making sandwiches interesting to kids. I saw an idea for rolling up a piece of bread to make it look like sushi. I figured this would be a neat idea to try with Chloe for our road trip.

Chloe has not always been a sandwich girl. It took a long time to convince her to eat toast. Now she loves pb and j on toast. But she makes a huge mess.

I was kind of skeptical of this idea because food with Chloe is so hit and miss. I only made one. And I kicked myself for it later. She inhaled it.

I took a piece of flax seed bread and cut the crusts off.

20140523-215057-78657526.jpg
I put the natural peanut butter on and then the jam.

20140523-215141-78701026.jpg
I didn’t think I put much jam on, but when I rolled it up, I had to wipe excess jam away.

20140523-215229-78749963.jpg
I secured the sandwich rollup with a toothpick until I gave it to Chloe.

It was surprising how much she liked this idea. Maybe just because it was novel. But who cares! She ate her dinner. That’s all I care about.